 CipherPayDOCS
Documentation
Accept shielded Zcash payments. Non-custodial. Set up in minutes.
If you run a Shopify store, you can accept Zcash payments with CipherPay using a merchant-owned custom app. The app handles invoice creation, shows a payment button on the Thank You page, and updates order statuses when payment is confirmed.
When a customer selects "Pay with Zcash (ZEC)" at checkout, the app:
2. Displays a "Pay with CipherPay" button on the Thank You page
3. The customer clicks the button and pays by scanning the QR code with their Zcash wallet
4. CipherPay sends a webhook back to the app
5. The app marks the Shopify order as paid automatically
Create or log into a free Shopify Partner account, then open the Shopify Dev Dashboard and create a new app. This is a private custom app for your own store — you do not submit it to the Shopify App Store.
https://connect.cipherpay.app temporarily when creating the app. CipherPay will set the final app URL when the checkout block is deployed.Redirect URL — Use
https://connect.cipherpay.app/api/auth/callback.Scopes — Use
read_orders,write_orders.Embedded app — Leave disabled.
Copy the app's Client ID and Client Secret from Settings → Credentials. Both must come from the same app; a secret from another app makes the install fail with "Client Secret does not match this app". Then create a service account (app Settings → App CLI automation token → Manage → Add service account, with App development access to this app) and copy its token in the same Dev Dashboard and copy its token. An existing App automation token (atkn_...) also works. CipherPay uses these to securely deploy the checkout block to your private app. The service account token is used once and is not stored.
The checkout block calls CipherPay to create the invoice, which Shopify treats as network access. This setting lives in the Partner Dashboard (partners.shopify.com), not the Dev Dashboard:
2. Open API access requests
3. Under "Allow network access in checkout and account UI extensions", click Allow network access. It is approved immediately.
Go to CipherPay Dashboard → Settings → Integrations → Shopify. Paste your permanent store domain, Shopify Client ID, Client Secret, Shopify service account token, and CipherPay dashboard token.
CipherPay will create a dedicated restricted API key, configure the webhook URL, and deploy the checkout extension to your private Shopify app. The app version will contain the final App URL and Redirect URL automatically, so you do not need to manually edit the version URLs after deployment.
Wait for the status to show connected. If it shows action needed, Shopify created the version but did not release it: finish step 2, then open the version from the link shown and click Release.
Next, choose Custom distribution in Shopify and enter your store's permanent .myshopify.com domain. Shopify will generate a private install link for your store.
Open the install link and approve the app. If Shopify shows both a store name and an internal generated domain, use the permanent domain Shopify uses in the install link. You'll be redirected to the CipherPay Shopify settings page.
After installation, you'll be redirected to the CipherPay Shopify settings page. If setup was completed from the CipherPay dashboard, your API key, webhook secret, and API URL should already be configured.
You only need to edit this page if you are troubleshooting or intentionally replacing the generated restricted API key.
In your Shopify admin, go to Settings → Payments → Manual payment methods and add a method called exactly:
Pay with Zcash (ZEC)This is the payment option customers will see at checkout. You can add a description like "Pay securely with Zcash cryptocurrency via CipherPay."
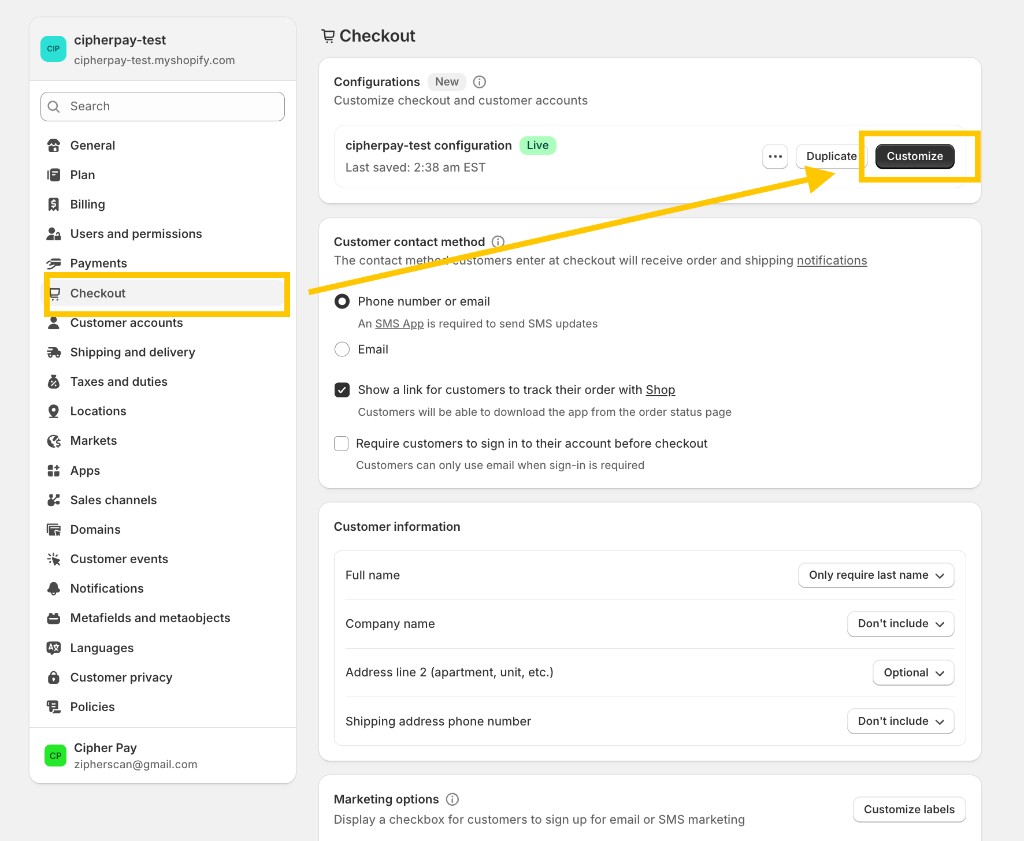
The CipherPay button needs to be placed on the checkout Thank You page:
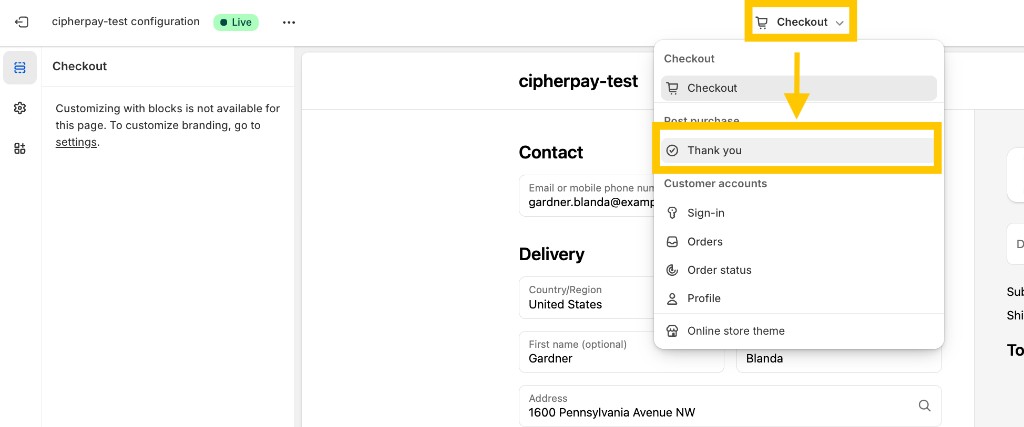
2. In the page selector (top of the editor), switch to Thank you
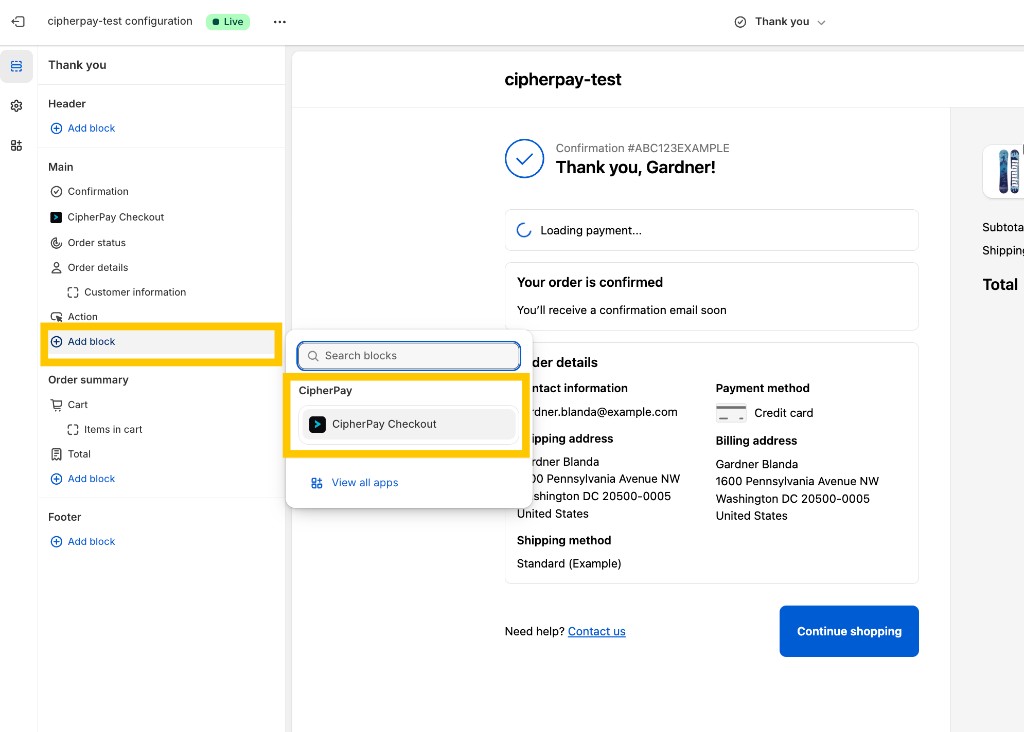
3. In the left sidebar, click Add block under the Main section
4. Select CipherPay Checkout from the app blocks list
5. Click Save
Add an item to your cart and proceed to checkout. Select "Pay with Zcash (ZEC)" as the payment method and complete the order. On the Thank You page, you'll see a "Pay with CipherPay" button.
Click the button to open the CipherPay payment page. Pay with your Zcash wallet. Once payment is confirmed, the Shopify order will be automatically marked as paid.
"Client Secret does not match this app" during install — The secret saved in CipherPay belongs to a different Shopify app. Copy the Client Secret from the app with the same Client ID, run setup again, and reinstall.
Order status doesn't update after payment — Open the CipherPay Shopify settings page and confirm the API key, webhook secret, and API URL are configured.
"Payment not ready" message — This usually means the app is still creating the invoice. Wait a few seconds and try again. If it persists, confirm the connector settings are configured.
Need help? — Contact us at contact@atmospherelabs.dev